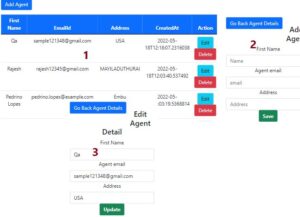
In this article, we will learn how to create a CRUD operation in React js using Axios and with a real-time rest API. We have already learned how to create CRUD operations Using the fetch function now in this post we will perform the insert update, and delete example operation using Axios.
After the awesome response to a published article by me: Simple React.js CRUD Example With Rest API to help beginners, I decided to rewrite the article with step by step approach using Axios, since it is the latest topic in the IT industry today.
I have written this article focusing on newbie developers so they can understand the basics of the concept of Axios class component, and calling rest API using Axios.
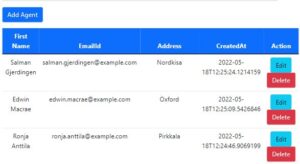
First, we will Fetch data from API and display it in the table using Axios in a class component and then we will perform insert, update and delete operations.
Crud operations in React Js with Axios and Rest API
Before starting creating the application let’s have a look at the rest API part first. We are going to use TravelAgent table for performing CRUD Operations. Here is the rest API for performing the CRUD operation.

1.GET http://samplerestapi.com/api/TravelAgent
[

{
"id": 121212,
"agent_name": "yeem soni",
"agent_email": "[email protected]",
"agent_location": "USA",
"createdat": "2022-05-18T11:19:00.2704177"
},
{
"id": 121211,
"agent_name": "nanoi soni",
"agent_email": "Mayank77@gmail.",
"agent_location": "USA",
"createdat": "2022-05-18T11:19:00.0125955"
}
{
"id": 121206,
"agent_name": "kil soni",
"agent_email": "Mayank77@g",
"agent_location": "USA",
"createdat": "2022-05-18T11:18:58.1125961"
},
{
"id": 121205,
"agent_name": "tony soni",
"agent_email": "Mayank77@",
"agent_location": "USA",
"createdat": "2022-05-18T11:18:57.683823"
},
{
"id": 121204,
"agent_name": "southy soni",
"agent_email": "Mayank77",
"agent_location": "USA",
"createdat": "2022-05-18T11:18:57.0549635"
},
{
"id": 121203,
"agent_name": "dublin soni",
"agent_email": "Mayank78",
"agent_location": "USA",
"createdat": "2022-05-18T11:18:53.6840485"
}
]
2.POST http://samplerestapi.com/api/TravelAgent
Request Parameter
{
"agent_name": "string",
"agent_email": "string",
"agent_location": "string"
}
3. PUT http://samplerestapi.com/api/TravelAgent/12514
Request Parameter
{
"id": 12514,
"agent_name": "string",
"agent_email": "string",
"agent_location": "string"
}4.DELETE http://samplerestapi.com/api/TravelAgent/12514
Step 1. Create React js App
Now, let’s create a React app using the below command.
npx create-react-app crud-app
Step 2. Create React Component
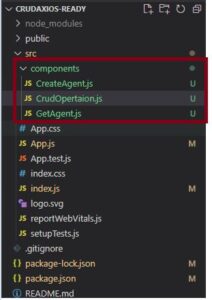
Create a “components” folder inside the src folder in our react js application and add 3 files inside that folder.
- CrudOpertaion.js
- CreateAgent.js
- GetAgent.js

Step 3. Install bootstrap in our project
Now, let’s install bootstrap to create a lovely UI for our application.
npm install react-bootstrap bootstrap
If you get any errors while installing bootstrap then try the below command
npm install react-bootstrap –legacy-peer-deps
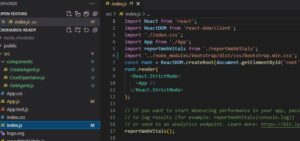
import bootstrap in index.js

Step 4. Install Axios library in our project
Axios is the latest promise-based JavaScript HTTP client library that works asynchronously and allows our app to make HTTP calls and consume REST API very efficiently.
npm install axios –save axios
Step 5. Do coding in the file to perform our operation
CrudOpertaion.js
import React, { Component } from 'react';

import { Container, Button } from 'react-bootstrap';
import AgentList from './GetAgent';
import CreateAgent from './CreateAgent';
import axios from 'axios';
const apiUrl = 'http://192.168.1.105:234/';

class CrudOpertaion extends Component {
  constructor(props) {
    super(props);
this.initialState = {
      id: '',
      agent_name: '',
      agent_email: '',
      agent_location: '',
    }
this.state = {
      isAddagent: false,
      error: null,
      response: {},
      agentData: {},
      isEditagent: false,
      isAgentDetails: true,
    }

this.onCreateAgent = this.onCreateAgent.bind(this);

  }

  onCreate() {
this.setState({ isAddagent: true });
this.setState({ isEditagent: false });
this.setState({ isAgentDetails: false });
this.setState({ agentData: this.initialState });
  }
  onDetails() {
this.setState({ isAgentDetails: true });
this.setState({ isAddagent: false });
this.setState({ isEditagent: false });
  }

  onCreateAgent(data) {
this.setState({ isAddagent: true });
this.setState({ isAgentDetails: true });
    debugger;
if (this.state.isEditagent)
    {
      axios.put(apiUrl + 'api/TravelAgent/'+data.id, data).then(result => {
        alert('Updated successfully!');
this.setState({
          response: result.data,
          isAddagent: false,
          isEditagent: false
        })
      });
    } else {

      axios.post(apiUrl + 'api/TravelAgent', data).then(result => {
        alert('Created successfully!');
this.setState({
          response: result,
          isAddagent: false,
          isEditagent: false
        })
      });
    }

  }

  editAgent = agentId => {
    debugger;
this.setState({ isAgentDetails: false });
    axios.get(apiUrl + "api/TravelAgent/" + agentId).then(result => {

this.setState({
        isEditagent: true,
        isAddagent: true,
        agentData: result.data
      });
    },
      (error) => {
this.setState({ error });
      }
    )

  }

  render() {

    let userForm;
    debugger;
if (this.state.isAddagent || this.state.isEditagent) {
      userForm = <CreateAgent onCreateAgent={this.onCreateAgent} agent={this.state.agentData} />

    }

return (
      <div className="App">
        <Container>
          <h1 style={{ textAlign: 'center' }}>CURD operation in React</h1>
          <hr></hr>

          {!this.state.isAgentDetails && <Button variant="primary" style={{ float: 'left', marginBottom: '15px' }} onClick={() => this.onDetails()}>Go Back Agent Details</Button>}

          {!this.state.isAddagent && <Button variant="primary" style={{ float: 'left', marginBottom: '15px' }} onClick={() => this.onCreate()}>Add Agent</Button>}
          <br></br>

          {!this.state.isAddagent && <AgentList editAgent={this.editAgent} />}
          {userForm}
        </Container>
      </div>
    );
  }
}
export default CrudOpertaion; - onCreate(): Sets state variables to enable adding a new agent.
- onDetails(): Sets state variables to show agent details.
- onCreateAgent(data): Handles the creation or editing of an agent. It sends a POST request to create a new agent or a PUT request to update an existing one.
- editAgent(agentId): Retrieves agent details by making a GET request to the server and sets state variables to enable editing.
import { Table, Button } from 'react-bootstrap';
import axios from 'axios';
import React from 'react';

const apiUrl = 'http://samplerestapi.com';

class AgentList extends React.Component {
  constructor(props) {
    super(props);
this.state = {
      error: null,
      agents: [],
      response: {}
    }
  }

  componentDidMount() {
    axios.get(apiUrl + '/api/TravelAgent').then(response => response.data).then(
      (result) => {
this.setState({
          agents: result
        });
      },
      (error) => {
this.setState({ error });
      }
    )
  }


  deleteAgent(agentId) {
const { agents } = this.state;
    axios.delete(apiUrl + '/api/TravelAgent/' + agentId).then(result => {
      alert('deleted successfully');
this.setState({
        response: result,
        agents: agents.filter(agent => agent.id !== agentId)
      });
    });
  }

  render() {
const { error, agents } = this.state;
if (error) {
return (
        <div>Error:{error.message}</div>
      )
    }
else {
return (
        <div>

          <Table className='table'>
            <thead className="btn-primary">
              <tr>
                <th>First Name</th>
                <th>EmailId</th>
                <th>Address</th>
                <th>CreatedAt</th>
                <th>Action</th>
              </tr>
            </thead>
            <tbody>
              {agents.map(agent => (
                <tr key={agent.id}>
                  <td>{agent.agent_name}</td>
                  <td>{agent.agent_email}</td>
                  <td>{agent.agent_location}</td>
                  <td>{agent.createdat}</td>
                  <td>
                    <Button variant="info" onClick={() => this.props.editAgent(agent.id)}>Edit</Button>
                    <Button variant="danger" onClick={() => this.deleteAgent(agent.id)}>Delete</Button>
                  </td>
                </tr>
              ))}
            </tbody>
          </Table>
        </div>
      )
    }
  }
}

export default AgentList; import React from 'react';
import { Row, Form, Col, Button } from 'react-bootstrap';
class CreateAgent extends React.Component {
constructor(props) {
super(props);
debugger;
this.initialState = {
id: '',
agent_name: '',
agent_email: '',
agent_location: '',
}
if (props.agent.id) {
this.state = props.agent
} else {
this.state = this.initialState;
}
this.handleChange = this.handleChange.bind(this);
this.handleSubmit = this.handleSubmit.bind(this);
}
handleChange(event) {
const name = event.target.name;
const value = event.target.value;
this.setState({
[name]: value
})
}
handleSubmit(event) {
event.preventDefault();
this.props.onCreateAgent(this.state);
this.setState(this.initialState);
}
render() {
let pageHeading;
let btnText;
if (this.state.id) {
pageHeading = <h2>Edit Agent Detail</h2>
btnText = <b>Update</b>
} else {
pageHeading = <h2>Add Agent</h2>
btnText = <b>Save</b>
}
return (
<div>
<b> {pageHeading}</b>
<Row>
<Col sm={12}>
<Form onSubmit={this.handleSubmit}>
<Form.Group controlId="FirstName">
<Form.Label>First Name</Form.Label>
<Form.Control
type="text"
name="agent_name"
value={this.state.agent_name}
onChange={this.handleChange}
placeholder="Name" />
</Form.Group>
<Form.Group controlId="EmailId">
<Form.Label>Agent email</Form.Label>
<Form.Control
type="text"
name="agent_email"
value={this.state.agent_email}
onChange={this.handleChange}
placeholder="email" />
</Form.Group>
<Form.Group controlId="agent_location">
<Form.Label>Address</Form.Label>
<Form.Control
type="text"
name="agent_location"
value={this.state.agent_location}
onChange={this.handleChange}
placeholder="Address" />
</Form.Group>
<Form.Group>
<Form.Control type="hidden" name="AgentId" value={this.state.id} />
<Button variant="success" type="submit">{btnText}</Button>
</Form.Group>
</Form>
</Col>
</Row>
</div>
)
}
}
export default CreateAgent; Step 6. Import component in App.js
import logo from './logo.svg';
import './App.css';
import Opertaion from "./components/CrudOpertaion"
function App() {
return (
    <div className="container-fluid">
      <Opertaion/>
    </div>
  );
}

export default App;
so, our coding part is completed, and run npm start command perform to see the result.

I’m assuming that you are familiar with React Js framework and creating React Js applications. If not then please go through the following articles:
In React, a part is alluded to as a segregated piece of code which can be reused in either module. The React application contains a root part in which other subcomponents are incorporated; for instance – in a solitary page, the application is partitioned into 3 sections – Header, Main Content, and Footer. Along these lines, there is a solitary App Component having 3 subcomponents – Header Component, MainContent Component, and Footer Component.
There are 2 kinds of parts in React.js Stateless Functional Component and Stateful Class Component
Stateless Functional Component
This kind of part incorporates basic JavaScript capacities. These parts incorporate unchanging properties, i.e., the incentive for properties can’t be changed. We want to utilize Hooks (will be examined in the following article) to accomplish usefulness for making changes in properties utilizing JS. A utilitarian part is utilized mostly for UI.
Stateful Class Component
The Class part is ES6 classes which broaden the Component class from React library. The class part should incorporate the render technique which brings HTML back.
 Read more article